
Why bother shooting in manual mode when cameras are designed so intelligently these days? The most simple explanation is that you want to be the one who decides what part of the image is in focus, how blurry the background is and how it’s exposed (light or dark).
When you take pictures in automatic mode, the camera will select all the settings. When you let the camera choose which focus point to use, your subjects may be unintentionally out of focus, the background in focus, and your image ruined. While in auto mode, it’s left up to your camera to decide what lighting to expose for, which can lead to overly bright or dark images. Taking creative control of your camera’s settings in manual mode is the only way to achieve consistent results in your images.
To begin shooting in manual mode, there are some basic principles that you’ll need to become familiar with, the most foundational being the exposure triangle. I’m going to break these down for you right here in the simplest way possible. Once you have a basic understanding of how the three elements in the exposure triangle effect each other, you’re well on your way to capturing images that tell the story the way you see it.
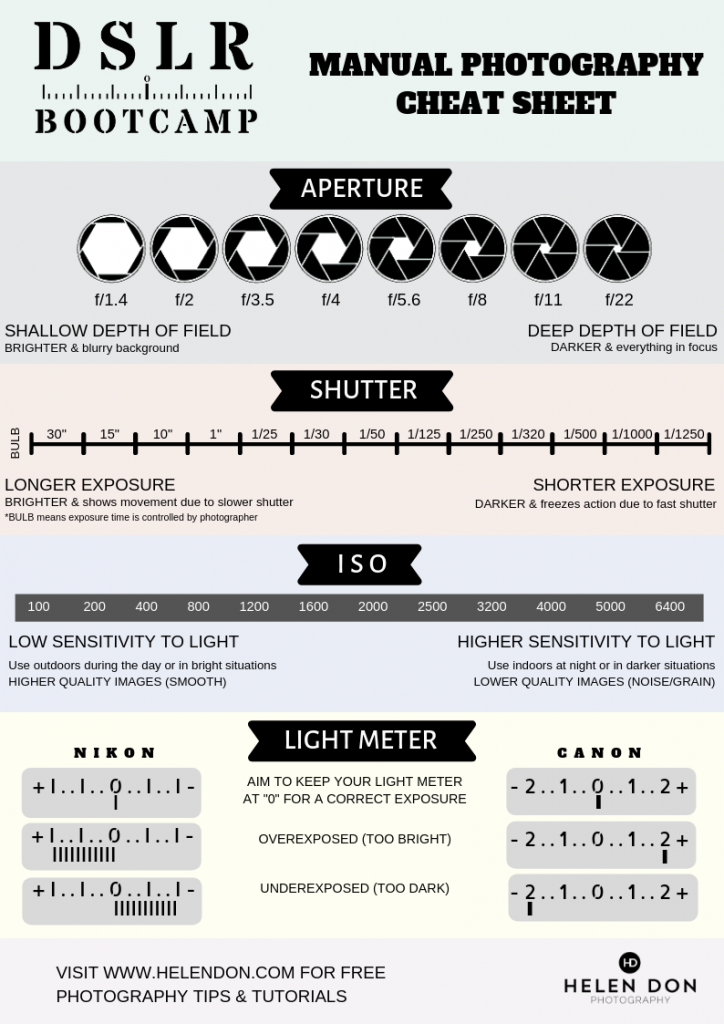
The three elements of the exposure triangle are: Aperture, Shutter Speed and ISO.

Aperture
This is the most important element of the exposure triangle, in my opinion. It’s the setting that I feel “tells the story” in my images. Aperture refers to the size of the opening in the lens that allows light into the camera’s sensor. The size of this hole will determine the depth of field, meaning how blurry the foreground and background are around the subject in the image.
Shutter Speed
The length of time that the shutter stays open to let in light through the hole in the lens is your shutter speed. To me, this is the second most creative element in the exposure triangle. I take mostly portraits, so I need my subjects to be tack-sharp. This means I need a pretty fast shutter speed to ensure that I freeze action and rule out the possibility of blur from not holding the camera still enough in my hands. You may want slower shutter speeds to show movement in creative images, but for standard portraits, you want to keep it fast.
ISO
The least creative element in my photography, yet still a vital part of keeping the balance in the triangle, is ISO. This refers to the level of sensitivity of the camera’s image sensor. Back in the day, photographer’s had to select which quality of film they’d load into their camera and they’d be stuck with that roll. Now we can change this setting for each image we take. The aim is to keep the image quality high by using a low ISO setting. But in darker situations, you may need a higher ISO to balance out the triangle, which will introduce some grain into the image. Grain is better than underexposed or out of focus, so use a higher ISO when needed.
Now that you know what the exposure triangle is all about, you need to put these elements into balance using your guide, the light meter! This is the amazing built-in tool that you see when you put your eye up to the viewfinder, and it looks something like this:
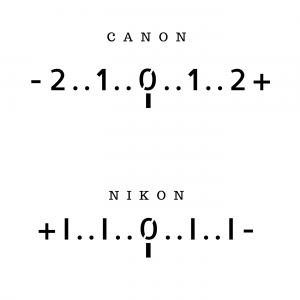
The “goal” when you’re starting out shooting manual is that you balance all the settings in the triangle so that you get a “correct” exposure, meaning that the little bar is right under the zero in the light meter. If it’s to the left or the right, then it’s telling you that your image is either going to be underexposed (too dark) or overexposed (too light). If your meter is telling you that your exposure is going to be off, you need to adjust at least one of the three elements in the exposure triangle to get them in balance.
It takes time and practice to become quick at changing your settings in manual mode, but being able to manipulate how much light enters your lens will elevate your ability to capture the world around you. Until you’re well-versed in how to adjust your aperture, shutter speed and ISO to various situations, my digital photography cheat sheet will help you remember which setting does what. Download it HERE and print it out or save it to your phone so that you can reference it wherever you are with your camera.
If you’re ready to take the next step in your photography journey, DSLR Bootcamp course will take you from novice to intermediate in the shortest possible amount of time with my concise lessons, instruction and visual examples. In the meantime, be sure to sign up to receive my FREE photography tips here!
If you liked this post, you may enjoy these:
- TOP 10 TIPS FOR STARTING OUT IN PHOTOGRAPHY
- ONE EASY WAY I IMPROVED MY PHOTOGRAPHY
- 3 STEPS FOR SHOOTING IN HARSH SUN

good informaction